> ## Documentation Index
> Fetch the complete documentation index at: https://flywheel.mintlify.site/llms.txt
> Use this file to discover all available pages before exploring further.
# Domain Setup
> Setting up your sending domain for Flywheel integration
# Get started
## Setting up your domain
Steps for adding a sending domain to your account.
When you set up your account for the first time, you need to set up your domain records in order to start sending email. We'll be sending email on your behalf, so we need to verify that you own the domain you're sending from. Don't worry - we'll make this process smooth and straightforward.
Here's how to set it up in just a few steps:
### Step 1: Navigate to the email settings page
Go to **Settings** -> **Email** and click **Add Domain**. Or [click here](https://app.flywheel.cx/dashboard/deeplink?target=/settings/email) to go directly to the page.
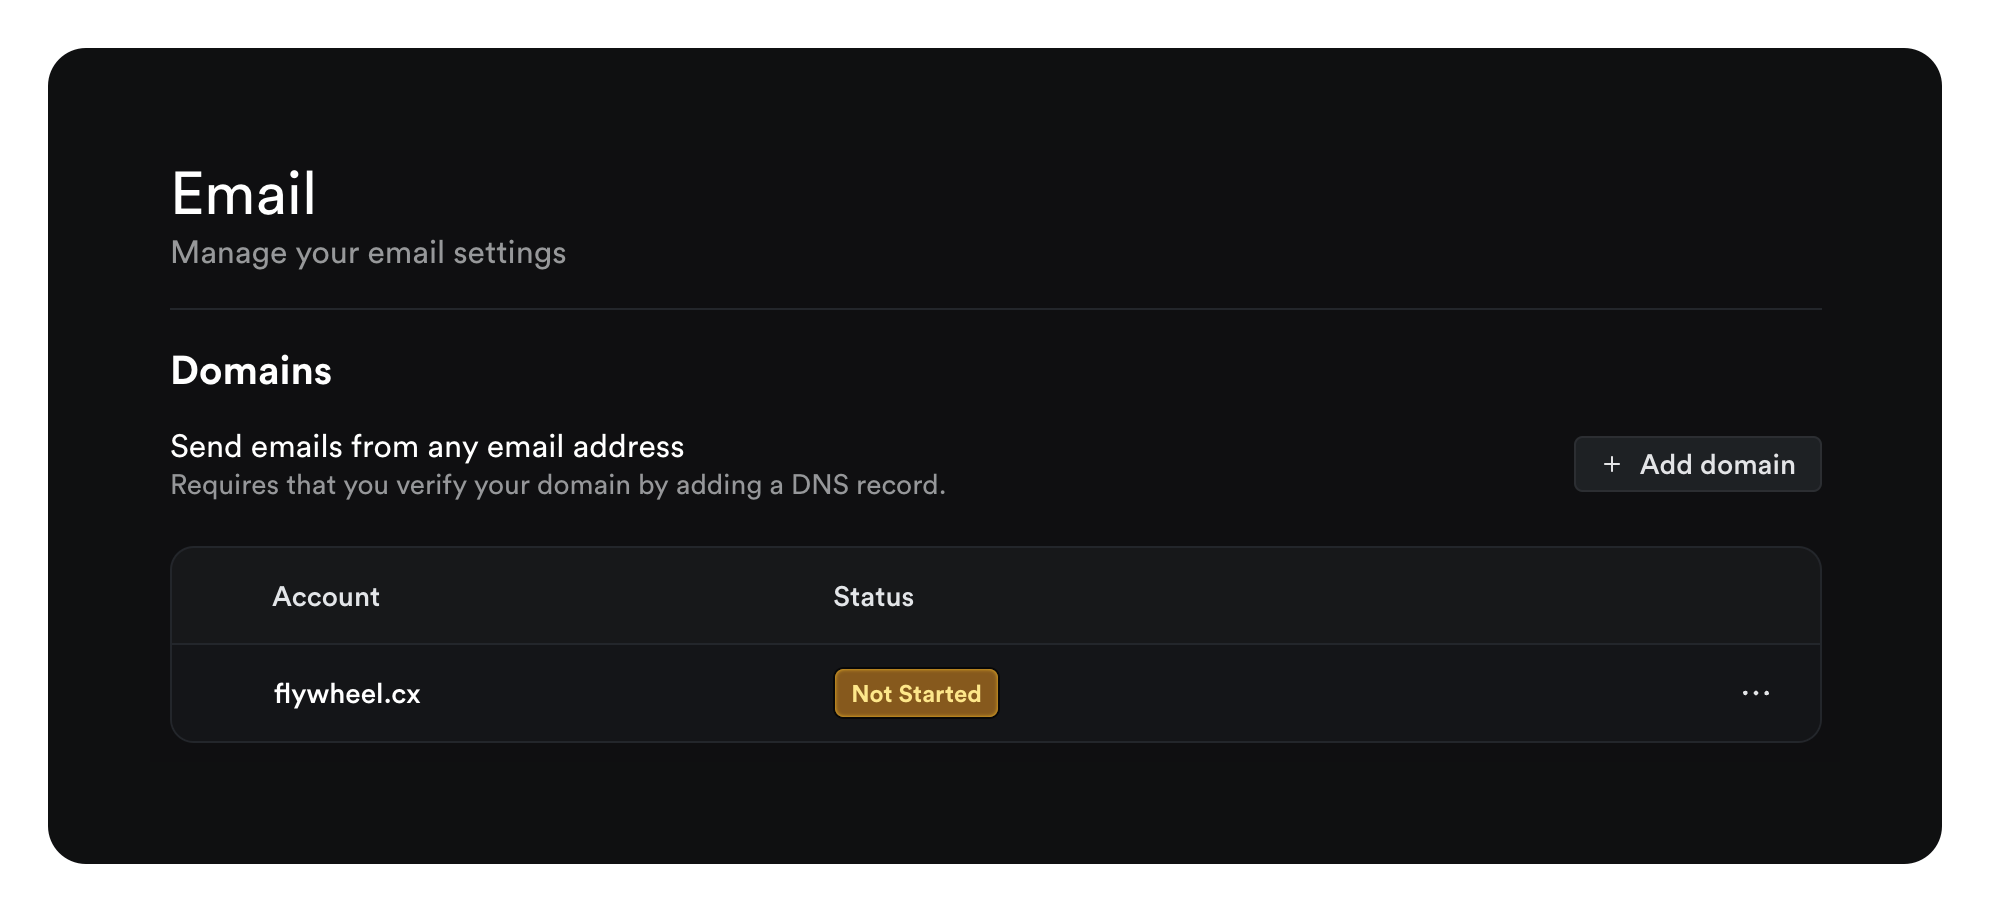 ### Step 2: Add your domain
Add your domain to the input field and click **Add Domain**.
### Step 2: Add your domain
Add your domain to the input field and click **Add Domain**.
 You can add either your primary domain (e.g., `yourdomain.com`) or a subdomain (e.g., `mail.yourdomain.com`). For marketing and automated emails, we
recommend using a subdomain like `mail.yourdomain.com` to maintain separate email reputation. For one-to-one communications, you may prefer using
your root domain.
### Step 3: Add your domain records
These are SPF, DKIM and MX records that need to be set up in your domain zone editor inside of your domain registrar like Namecheap, Google Domains, AWS, Godaddy or elsewhere.
A clipboard icon will appear next to each record when you hover over it. You can use this to copy the records to your clipboard and easily paste them into your domain registrar.
Copy and paste the records one by one into your registrar.
You want to use the Type (indicated as TXT, CNAME and MX) in setting up your records, not the title of the record e.g. SPF, DKIM, MX.
Once you have copied your records to your registrar, click the **Start Verification** button to verify they have been set up correctly.
#### Domain Provider Specific Instructions
DNS records can be added from the "DNS" page within a website.
1. Click Add record to open the form
2. Select a "Type" (TXT, MX or CNAME)
3. Paste the "Name" and "Value" information
4. Be sure to set the proxy to "DNS Only" for the CNAME records
[See Cloudflare's guide](https://developers.cloudflare.com/dns/manage-dns-records/how-to/create-dns-records/#create-dns-records)
DNS records can be managed from the DNS Management page:
1. Sign in to your GoDaddy account and go to your Domain List
2. Select the domain you want to modify and click "DNS"
3. In the DNS Management page, scroll to "Records"
4. Click "Add" to create a new record
5. Select the record type (TXT, MX, or CNAME)
6. Fill in the required fields:
* For TXT records: Enter the "Host" and "TXT Value"
* For MX records: Enter the "Priority" and "Points to"
* For CNAME records: Enter the "Host" and "Points to"
7. Click "Save"
Note: Changes may take up to 48 hours to propagate, though they often take effect much sooner.
[See GoDaddy's detailed guide](https://www.godaddy.com/help/manage-dns-records-680)
1. Go to the Advanced DNS page for your domain
2. If using automatic Gmail/Gsuite integration, disable it and switch to Custom MX in the Mail Settings dropdown
3. [Add an MX record](https://support.google.com/a/answer/174125#current\&legacy\&zippy=%2Cgoogle-workspace-current-version-later) to set up Gmail on your domain again
4. Add Flywheel's MX records by clicking Add new record in the "Mail Settings" section
5. Add the TXT and CNAME records in the "Host Records" section
[See Namecheap's detailed guide](https://www.namecheap.com/support/knowledgebase/article.aspx/322/2237/how-can-i-set-up-mx-records-required-for-mail-service/)
DNS records can be added through the AWS Route 53 console:
1. Sign in to the AWS Management Console and open [Route 53](https://console.aws.amazon.com/route53/)
2. In the navigation pane, select "Hosted zones"
3. Select your domain name from the list
4. Click "Create record" to add a new DNS record
5. For each record:
* Choose the record type (TXT, MX, or CNAME)
* Enter the record name (subdomain)
* Enter the record value
* Keep TTL as default (300 seconds) or adjust as needed
* Click "Create records"
Note: Changes typically propagate to all Route 53 DNS servers within 60 seconds.
[See AWS Route 53's guide](https://docs.aws.amazon.com/Route53/latest/DeveloperGuide/resource-record-sets-creating.html)
DNS records can be added through Squarespace's DNS Settings panel:
1. In your Squarespace dashboard, click **DNS**, then **DNS Settings**
2. Scroll down to **Custom Records**
3. Click **Add record**
4. For each record type:
**For MX Records:**
* Select "MX" from Type dropdown
* Enter "@" in Host field (or subdomain if using one)
* Enter priority number (0-255) in Priority field
* Enter mail server URL in Data field
**For TXT Records (DKIM/SPF):**
* Select "TXT" from Type dropdown
* Enter host/name from provider (or "@" if none specified)
* Enter the DKIM or SPF record in Data field
**For CNAME Records:**
* Select "CNAME" from Type dropdown
* Enter subdomain in Host field
* Enter the target domain in Data field
Notes:
* Squarespace supports DKIM and SPF records up to 2048 bits
* Other TXT records have a 255 character limit
* Multiple SPF records will be automatically merged
* You may need to trim trailing periods from record values
[See Squarespace's guide](https://support.squarespace.com/hc/en-us/articles/31120985010957-DNS-records-for-email)
* Wix DNS doesn't support subdomains for MX records when nameservers point to Wix
* If you purchased a domain outside of Wix, use the "Pointing" method to set up DNS records externally
* When setting up MX records, ensure you enter the "Priority" (usually formatted as "10 {pastedrecordname}")
### Step 4: Verify your records are set up correctly
After configuring your records in your domain registrar, click Verify Records at the bottom of the page to check your configuration.
Note: Records can take up to an hour to propagate across all servers. During that time, you may see different records validate - this is completely normal. If some records haven't propagated yet, simply check back later.
If the domain is set up correctly, you'll see "Verified" in green next to each record section and the "Verified" status next to the domain. This means you're ready to start sending emails through Flywheel! 🚀
Need help? Hit us up at [support@flywheel.cx](mailto:support@flywheel.cx)
You can add either your primary domain (e.g., `yourdomain.com`) or a subdomain (e.g., `mail.yourdomain.com`). For marketing and automated emails, we
recommend using a subdomain like `mail.yourdomain.com` to maintain separate email reputation. For one-to-one communications, you may prefer using
your root domain.
### Step 3: Add your domain records
These are SPF, DKIM and MX records that need to be set up in your domain zone editor inside of your domain registrar like Namecheap, Google Domains, AWS, Godaddy or elsewhere.
A clipboard icon will appear next to each record when you hover over it. You can use this to copy the records to your clipboard and easily paste them into your domain registrar.
Copy and paste the records one by one into your registrar.
You want to use the Type (indicated as TXT, CNAME and MX) in setting up your records, not the title of the record e.g. SPF, DKIM, MX.
Once you have copied your records to your registrar, click the **Start Verification** button to verify they have been set up correctly.
#### Domain Provider Specific Instructions
DNS records can be added from the "DNS" page within a website.
1. Click Add record to open the form
2. Select a "Type" (TXT, MX or CNAME)
3. Paste the "Name" and "Value" information
4. Be sure to set the proxy to "DNS Only" for the CNAME records
[See Cloudflare's guide](https://developers.cloudflare.com/dns/manage-dns-records/how-to/create-dns-records/#create-dns-records)
DNS records can be managed from the DNS Management page:
1. Sign in to your GoDaddy account and go to your Domain List
2. Select the domain you want to modify and click "DNS"
3. In the DNS Management page, scroll to "Records"
4. Click "Add" to create a new record
5. Select the record type (TXT, MX, or CNAME)
6. Fill in the required fields:
* For TXT records: Enter the "Host" and "TXT Value"
* For MX records: Enter the "Priority" and "Points to"
* For CNAME records: Enter the "Host" and "Points to"
7. Click "Save"
Note: Changes may take up to 48 hours to propagate, though they often take effect much sooner.
[See GoDaddy's detailed guide](https://www.godaddy.com/help/manage-dns-records-680)
1. Go to the Advanced DNS page for your domain
2. If using automatic Gmail/Gsuite integration, disable it and switch to Custom MX in the Mail Settings dropdown
3. [Add an MX record](https://support.google.com/a/answer/174125#current\&legacy\&zippy=%2Cgoogle-workspace-current-version-later) to set up Gmail on your domain again
4. Add Flywheel's MX records by clicking Add new record in the "Mail Settings" section
5. Add the TXT and CNAME records in the "Host Records" section
[See Namecheap's detailed guide](https://www.namecheap.com/support/knowledgebase/article.aspx/322/2237/how-can-i-set-up-mx-records-required-for-mail-service/)
DNS records can be added through the AWS Route 53 console:
1. Sign in to the AWS Management Console and open [Route 53](https://console.aws.amazon.com/route53/)
2. In the navigation pane, select "Hosted zones"
3. Select your domain name from the list
4. Click "Create record" to add a new DNS record
5. For each record:
* Choose the record type (TXT, MX, or CNAME)
* Enter the record name (subdomain)
* Enter the record value
* Keep TTL as default (300 seconds) or adjust as needed
* Click "Create records"
Note: Changes typically propagate to all Route 53 DNS servers within 60 seconds.
[See AWS Route 53's guide](https://docs.aws.amazon.com/Route53/latest/DeveloperGuide/resource-record-sets-creating.html)
DNS records can be added through Squarespace's DNS Settings panel:
1. In your Squarespace dashboard, click **DNS**, then **DNS Settings**
2. Scroll down to **Custom Records**
3. Click **Add record**
4. For each record type:
**For MX Records:**
* Select "MX" from Type dropdown
* Enter "@" in Host field (or subdomain if using one)
* Enter priority number (0-255) in Priority field
* Enter mail server URL in Data field
**For TXT Records (DKIM/SPF):**
* Select "TXT" from Type dropdown
* Enter host/name from provider (or "@" if none specified)
* Enter the DKIM or SPF record in Data field
**For CNAME Records:**
* Select "CNAME" from Type dropdown
* Enter subdomain in Host field
* Enter the target domain in Data field
Notes:
* Squarespace supports DKIM and SPF records up to 2048 bits
* Other TXT records have a 255 character limit
* Multiple SPF records will be automatically merged
* You may need to trim trailing periods from record values
[See Squarespace's guide](https://support.squarespace.com/hc/en-us/articles/31120985010957-DNS-records-for-email)
* Wix DNS doesn't support subdomains for MX records when nameservers point to Wix
* If you purchased a domain outside of Wix, use the "Pointing" method to set up DNS records externally
* When setting up MX records, ensure you enter the "Priority" (usually formatted as "10 {pastedrecordname}")
### Step 4: Verify your records are set up correctly
After configuring your records in your domain registrar, click Verify Records at the bottom of the page to check your configuration.
Note: Records can take up to an hour to propagate across all servers. During that time, you may see different records validate - this is completely normal. If some records haven't propagated yet, simply check back later.
If the domain is set up correctly, you'll see "Verified" in green next to each record section and the "Verified" status next to the domain. This means you're ready to start sending emails through Flywheel! 🚀
Need help? Hit us up at [support@flywheel.cx](mailto:support@flywheel.cx)